digitalCAT
Online manual for the digitalCAT software
- Getting Started
- Translation
- Editing
- Dictionaries
- Formatting
- Production
- Theory and Logic
- Commands
- Advanced Features
- Frequently Asked Questions
- Common Errors and Messages
Getting Started
Installation
Translation
Editing
Dictionaries
Formatting
Production
Theory and Logic
Commands
Tokens
Paragraph Types
|
Question |
{Q} |
| Answer | {A} |
| Colloquy | {C} |
| Centered | {P CENTER} |
| Continuation | {<} |
| Parenthetical | {P PAREN} |
| By Line | {P BY} |
Text Formatting
| Bold | {b} |
| Italics | {i} |
| Underline | {u} |
| Subscript | {B} |
| Superscript | {S} |
Symbols
| Hard Space | ^ |
| Tab | > |
| Musical Note | {M} |
Miscellaneous
| Current Time | {T} |
| Bookmarks | {K ???} (Replace ??? with the name of the Bookmark) |
| Include Files | {I ???} (Replace ??? with the name of the Include File) |
| Lowercase Letter | {l+} and {l-} |
Advanced Features
Captioning
Dropbox Syncing
Network Editing
Overview
Network Editor is Digital CAT extension that allows for scopist to edit and attorneys to view transcript in realtime with court reporter. Actually court reporter's computer is network server and all connected users are clients, so its configuration is similar to any other client/server applications in local network (LAN).
The most simple way to configure Network Editor is to provide WiFi router to put all participants in a same local network, but of course client can be located outside LAN (in this case the configuration is more complex, because to provide access to court reporter administrator have to establish VPN connection inside local network or open ports on external router).
It is also highly recommended temporary turn off Windows firewall on reporter's computer, to allow other participants to connect to it (or open port in firewall, but turn it off is much simpler). (Fig. 1.1)
To do this open Control Panel > Windows Firewall (Fig. 1.1)
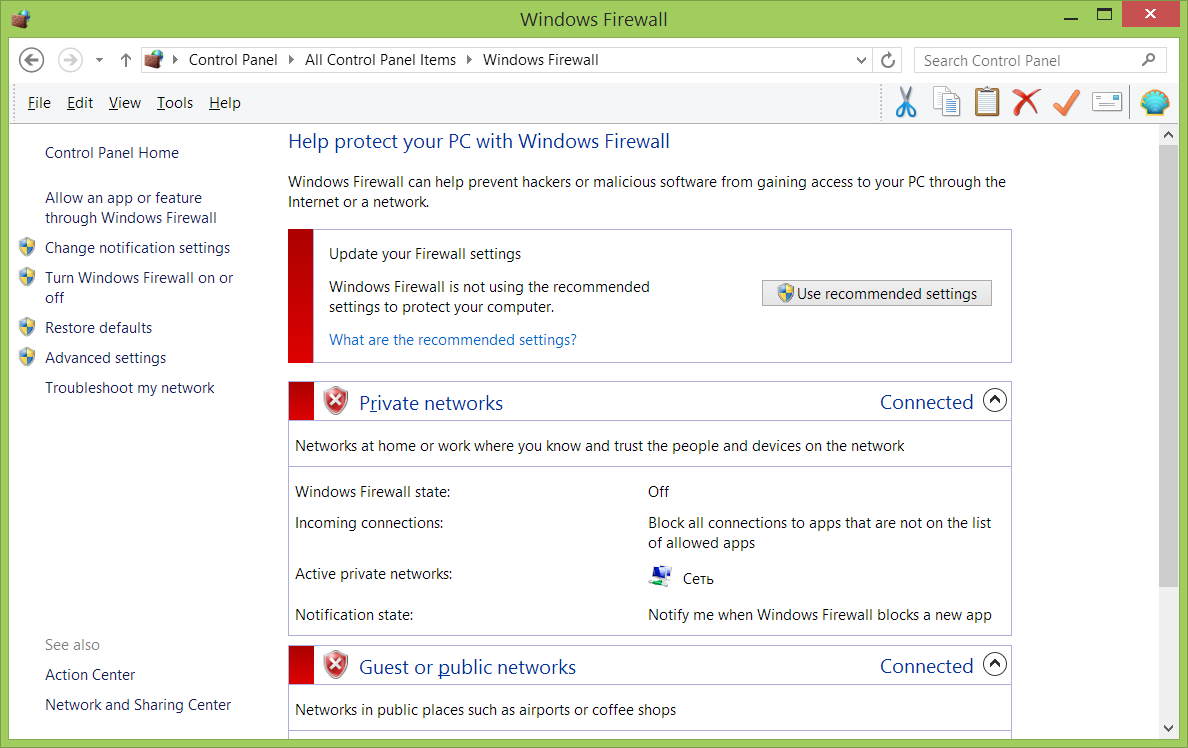
Configuring reporter's (server) computer
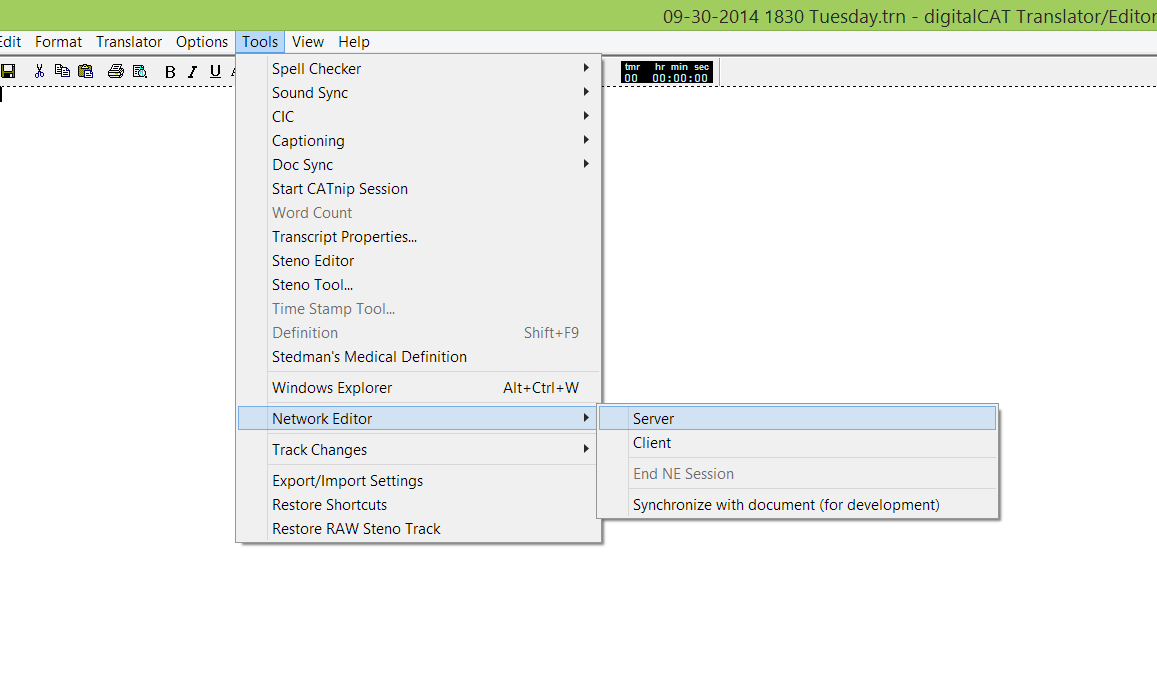
To configure server open Tools > Network Editor > Server dialog (Fig. 2.1.)
The following dialog will appear (Fig 2.2.)
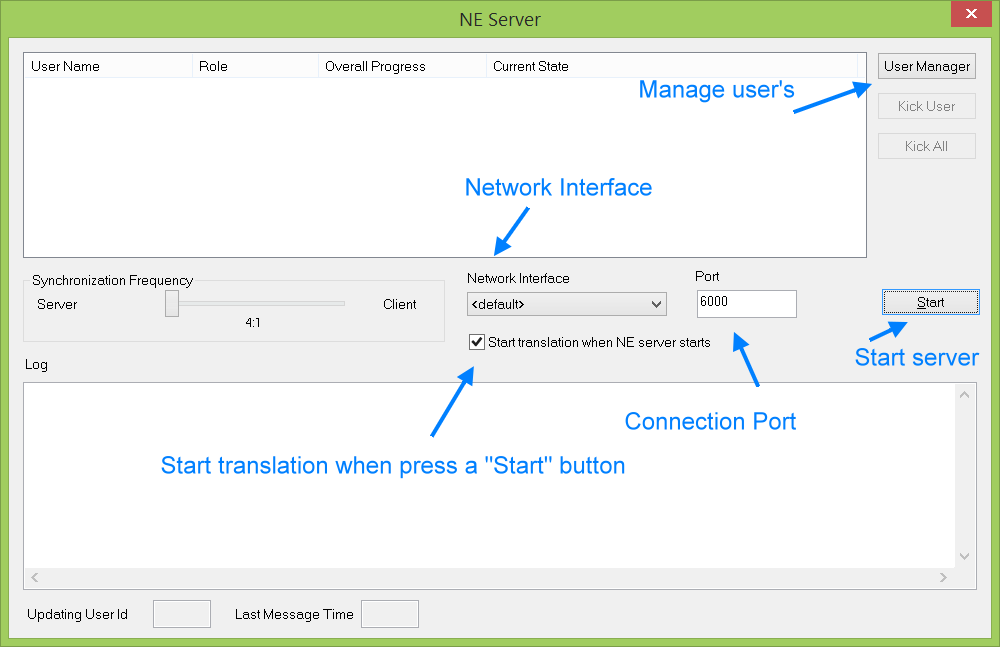
In most cases the only thing thatrequestyour attention is "User Manager" button that allows to configure access to a server.But you can always adjustserver'sparameters by the following options:
"Synchronization Frequency"means how often participantssendingchanges to each other. Bydefaultthis is 4:1 meaning that changes doing by reporter (server) has highest priority. I.e. server sends information about changes four times and once get changes from each scopist. This was done becausereporterdoing the most changes in transcript, so providing him with priority will allow all participants to have the most up to date transcript, while scopist's changes will be provided with small delay.
"Network Interface"requiredonly if you have any connection problems on computer with several network cards to select proper network card to bind to. In most cases "<default>" value should be OK.
"Port"is network port to connect to. I.e. to connect to serverparticipantsenter its address and connection port. There arefewreasons to change it from default "6000" value, in case if administrator opened external port or there is any existing service on computer using port 6000, but in mostcasesyou can left it without changes.
"Start translation when NE server starts"calls "Translator" > "Start Translation" just after you press a "Start" button to start NEsession,itis turned ON by default
"User Manager"allowsreporter to configure access to its computer. (Fig 2.3.)
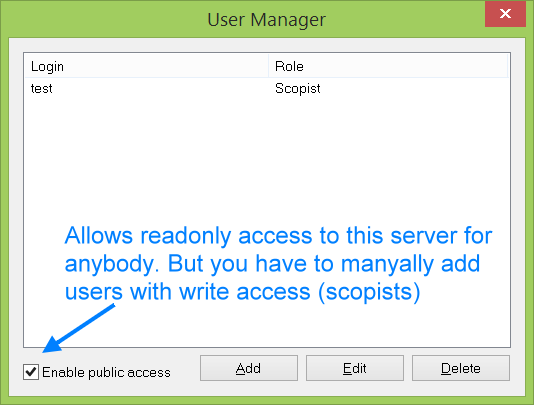
In this dialog you can create user accounts that will have access to your computer duringrealtime. There are two types of accounts available: "lawyer" that can only viewtranscript(readonly access) and "scopist" that can edit text in transcript.
It is recommended to keep"Enablepublic access" checkbox turned on, this allows users with any login/password connect toyoucomputer in readonly (viewing) mode.Soyou can add only accounts for your scopists in this case, and provide attorneys just with address or your computer and port to connect.
If you don't want to allow public access to yourcomputerturn off this option and add user accounts that required for connection.
Now you are ready to start, just press"Start" button to start network editor server.
Configuring scopist's (editor) or lawyer (viewer) computers
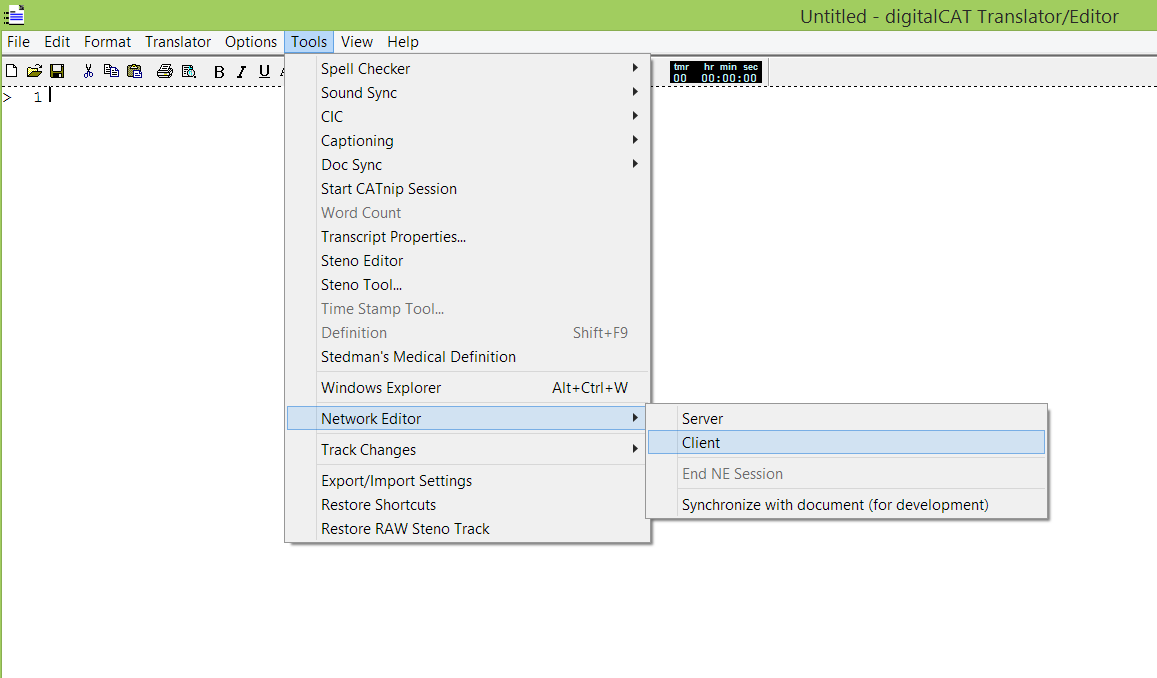
These two configurations are almost identical. Just open Tools > Network Editor > Client menu (Fig. 3.1.)
And provide login/password or your account with network IP address and port of a server. (Fig. 3.2.) If server has public access enabled you can provide any login password to access server in readoly mode, or you account login/password to access computer as a scopist (editor).
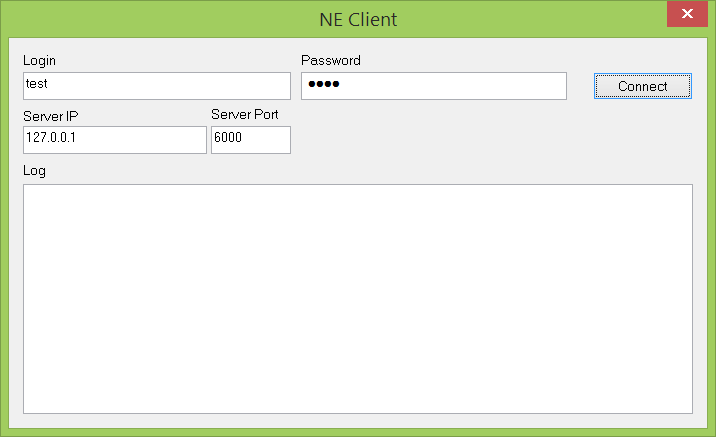
After that just press"Connect" button to connect to a server.
Advanced Topics
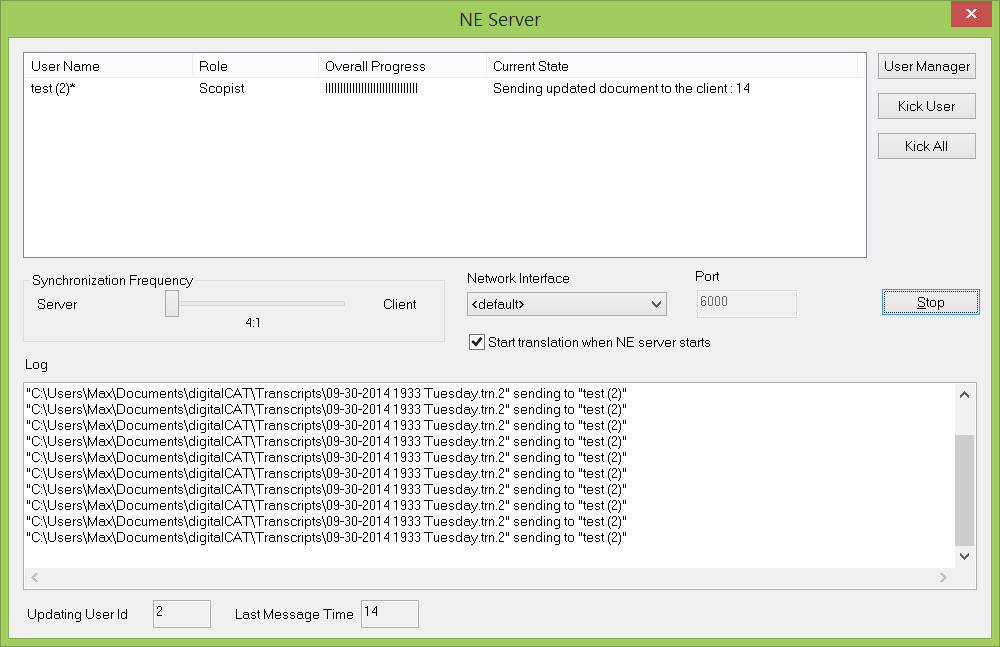
To view information about connected users onserver, just open server dialog again (Fig 4.1.)
Frequently Asked Questions
Why does my transcript have black bars instead of text?
This section of the transcript has been redacted.
If you were not intending on redacting anything in the transcript, you can go to the Edit menu, then click on Redaction, then click on Remove All Redaction.
How do I install PDF Support?
The built-in PDF support module is no longer available. However, you can save a PDF by using the Microsoft Print to PDF option when going to print your transcript. This option does not print a paper copy of the transcript, but instead allows you to save your transcript to a PDF.
Common Errors and Messages
Activation related messages
License Manager error.
digitalCAT hasn't been given an activation code yet. This message can be safely ignored. You can request an activation code normally.
System time changed by more than one day. (Crack?)
The time and date on your computer has changed since digitalCAT was last opened.
Check the time and date is set correctly on your computer.
If you continue getting the error message, you will need to contact Technical Support. Please make sure that you have internet access at that time, as a technician will need to remote to the computer in order to fix this issue.
Audio related messages
Media File seek position not found.
Wrong audio file
No driver.
No microphone connected.
Editing related messages
Autosave was slow to respond with a time of X milliseconds.
Something is causing digitalCAT to take an unusually long time to save the backup copies of your transcript.
If this message appears repeatedly, it may indicate that the auto save is set too frequently. Click on the Options menu, then click on General. Make sure the Auto save every X minutes is set to at least 5 minutes.
If that doesn't resolve the issue, you may need to reach out to Technical Support for further troubleshooting. If you need to disable the message from appearing, you can click on the Gear icon, and then uncheck Auto Save.
Translation related messages
Writer port could not be opened. Make sure the port is valid, and no other program is using it.
digitalCAT isn't correctly configured for your writer, or the writer is not being detected by the computer.
Double check that your writer is correctly installed and being detected by your computer. Right click on your Start button, and click on Device Manager. In the list of categories, your writer should show up in either the Ports (COM and LPT) or the Stenograph USB Writers categories. Make a note of which category the writer is in, and the COM port number, if any. Then, configure digitalCAT by going to the Translator menu, then click on Steno Source.
If the writer was in the Ports (COM and LPT) category, set the Primary Steno Device to the appropriate Realtime based on the manufacturer of your writer, and put the COM port number into Port 1. Click OK.
If the writer was in the Stenograph USB Writers category, set the Primary Steno Device to Stentura USB Realtime. There is no need to set a port number in Port 1. Click OK.
You should then be able to start translation normally.
Writer could not be initialized. Please make sure it is correctly connected and turned on.
digitalCAT is unable to communicate correctly with your writer.
Double check that your writer is correctly installed and being detected by your computer. Right click on your Start button, and click on Device Manager. In the list of categories, your writer should show up in either the Ports (COM and LPT) or the Stenograph USB Writers categories. Make a note of which category the writer is in, and the COM port number, if any. Then, configure digitalCAT by going to the Translator menu, then click on Steno Source.
If the writer was in the Ports (COM and LPT) category, set the Primary Steno Device to the appropriate Realtime based on the manufacturer of your writer, and put the COM port number into Port 1. Click OK.
If the writer was in the Stenograph USB Writers category, set the Primary Steno Device to Stentura USB Realtime. There is no need to set a port number in Port 1. Click OK.
You should then be able to start translation normally.
Realtime has ended on writer.
Your writer has closed its realtime file, and needs to open a new one.
Press a couple of strokes on the writer, then open the Translator menu and click on Stentura USB New File.